Wednesday, 31 December 2008

Dumping Emesene Chat Logs to HTML

Emesene is a free GTK based client for the Microsoft Live Messenger network. If you do not need the multi-protocol support of Pidgin, Emesene is a nice tool to have. It is very customizable and emulates WLM pretty closely.
One drawback of Emesene is the way it stores chat logs. First, a plugin named "Logger" needs to be enabled for logging to work. The Logger plugin stores the chats in an SQLite database which makes it very difficult to obtain the chat logs back. As far as I could understand, there are two ways to view the chat logs:

1. Enable the Eval plugin and execute the following command in a chat window
/eval out(controller.pluginManager.getPlugin("Logger").get_last_message("name@hotmail.com", 15))
This effectively shows the last 15 messages received from the user with the email address "name@hotmail.com". Unfortunately, the displayed messages are not formatted nicely and it is very difficult to follow the conversation this way. (For interested Python hackers, more info can be found here.)

2. Browse the SQLite database manually.
If your WLM account is me@hotmail.com, then the chat logs will be stored in "~/.config/emesene1.0/me_hotmail_com/cache/me@hotmail.com.db". You can browse this file by using a tool like sqliteman. Simply run
sudo yum install sqliteman to install it from the repositories. Then you can invoke it from the command line by simply typing "sqliteman". Unfortunately since the tables are normalized, it is very difficult to follow a conversation this way. You can write a SQL query to do a join between the tables so that the conversation is more readable, but this is simply unacceptable for normal users who may not be familiar with SQL.

Since none of the above methods were satisfactory for exporting an Emesene chat log; I wrote a simple Perl script to read the database and dump the conversations in HTML format. The script takes three arguments.
1. Full path to the Emesene SQLite database file. (eg. ~/.config/emesene1.0/me_hotmail_com/cache/me@hotmail.com.db)
2. Email address of the other participant. Partial strings are accepted. (eg. If you want to dump all the conversations with some_person@hotmail.com, you can simply type some_person)
3. Path to output the HTML file. (Eg. ~/tmp/my_chat_log.html)

So for example, to dump all conversations between you and some_person@hotmail.com, the script should be invoked as follows:
./emlog.pl ~/.config/emesene1.0/me_hotmail_com/cache/me\@hotmail.com.db some_person my_chats_wth_some_person.html

To access the SQLite database, this script uses DBD::SQLite module from CPAN. You may need to install it first using the command:
sudo cpan -i DBD::SQLite
The script can be downloaded from here. It is distributed under the Apache license, so feel free to modify it to your own needs.

Source Code:


#!/usr/bin/perl
################################################################################
# Copyright 2008 Charith K. Ellawala
#
# Licensed under the Apache License, Version 2.0 (the "License");
# you may not use this file except in compliance with the License.
# You may obtain a copy of the License at
#
# http://www.apache.org/licenses/LICENSE-2.0
#
# Unless required by applicable law or agreed to in writing, software
# distributed under the License is distributed on an "AS IS" BASIS,
# WITHOUT WARRANTIES OR CONDITIONS OF ANY KIND, either express or implied.
# See the License for the specific language governing permissions and
# limitations under the License.
###############################################################################

use DBI qw(:sql_types);


# check command line arguments
if($#ARGV != 2)
{
die("Usage: emlog.pl <path_to_db_file> <participant_email> <output_file>\n");

}

# assign args to meaningful names
my($dbfile,$email,$outfile) = @ARGV;

# open a connection to the db

my $dbh = DBI->connect("dbi:SQLite:dbname=$dbfile","","", {RaiseError => 1}) or die $DBI::errstr;


# prepare the SQL and execute it
my $sth = $dbh->prepare("SELECT DISTINCT c.id, datetime(c.started,'unixepoch') FROM conversation c, conversation_event ce WHERE c.id = ce.id_conversation AND ce.id_user = (SELECT id FROM user WHERE account LIKE ?) ORDER BY c.started");
$sth->bind_param(1,"\%$email\%",SQL_VARCHAR);

$sth->execute();

# open the file for output
open(FH,">$outfile") or die "Unable to open $outfile for writing";


# HTML header. Change values here to customize the look
my $html = <<END;
<html>
<head>
<title>Emesene Chat Log</title>

<style>
body
{
font-family:Sans;
font-size:12px;
}

.conv0
{
background-color:#E0E0E0;
border:1px solid black;
padding:5px;
}


.conv1
{
background-color:#FFFFFF;
border:1px solid black;
padding:5px;
}

.user0
{
color:blue;
padding:3px;
display:block;
border-bottom:1px dashed gray;
}


.user1
{
color:red;
padding:3px;
display:block;
border-bottom:1px dashed gray;
}
</style>
</head>
<body>

END
print FH $html;

# iterate through the conversations
my ($cid, $uid);
$cid = $uid = 0;


while(($id,$time) = $sth->fetchrow_array)
{
$uid = 0;
print FH "<div class=\"conv$cid\">";
print FH "<h3>Conversation time: $time</h3><br/>\n";

# get the content of the conversation
my $sth2 = $dbh->prepare("SELECT u.account, ce.data, datetime(e.stamp,'unixepoch') FROM conversation_event ce, user u, event e WHERE ce.id_user = u.id AND ce.id_event = e.id AND ce.id_conversation = $id");
$sth2->execute();

my $prevacc = '';
while(($acc,$txt,$ts) = $sth2->fetchrow_array)

{
# bit of modulo logic to colourize the different participants
if($acc ne $prevacc)
{

$prevacc = $acc;
$uid = ($uid + 1) % 2;
}


# The first two lines of the chat are garbage. Get rid of them here
my @tmp = split(/\n/,$txt);
splice(@tmp,0,2);
$txt = join('<br/>',@tmp);
print FH "<span class=\"user$uid\"><i style=\"color:black;\">[$ts] $acc :</i><br/>&nbsp;&nbsp;&nbsp;&nbsp;$txt</span><br/>\n";
}

print FH "</div><br/>";
$sth2->finish();
$cid = ($cid + 1) % 2;

}

print FH "</body>\n</html>";
close(FH);

# we are done
$sth->finish();

$dbh->disconnect();


syntax highlighted by Code2HTML, v. 0.9.1

Tuesday, 9 December 2008

TrueCrypt 6.1 Install Guide For Fedora 10

Compared to previous versions, installing TrueCrypt 6.1 on Fedora 10 was quite straightforward. Here is a quick list of steps to follow:

1. Download the TrueCrypt 6.1 source tarball from www.truecrypt.org
2. Untar the source
tar xvf TrueCrypt\ 6.1a\ Source.tar.gz
3. Install required libraries
sudo yum install nss-pkcs11-devel fuse-devel wxGTK wxGTK-devel
EDIT: You might also need the following packages if you haven't installed them already. (Thanks Vin).
sudo yum install gnome-keyring-devel gcc-c++
4. Export the Cryptoki include folder
export PKCS11_INC=/usr/include/gp11
5. Run make
make
You may get the following error messages:
../Common/SecurityToken.cpp:654: error: ‘CKR_NEW_PIN_MODE’ was not declared in this scope
../Common/SecurityToken.cpp:655: error: ‘CKR_NEXT_OTP’ was not declared in this scope

5.1 Open Common/SecurityToken.cpp in your favourite editor.
5.2 Scroll to line 654
5.3 Comment out line 654 and 655. It should look like this:
// TC_CASE_STR (CKR_NEW_PIN_MODE);
// TC_CASE_STR (CKR_NEXT_OTP);
5.4 Save and exit
5.5 Run make again
[Some people may not like to fiddle with code like this. But these two lines are only used to generate error messages. At the very worst, you will end up getting a generic error message instead of a more focussed one. ]
6. TrueCrypt is now compiled. You can find the executable inside the folder titled 'Main'. You might want to make it available from your bin directory for easy access.
sudo cp Main/truecrypt /usr/share/bin

All done!

Sunday, 2 November 2008

Romanized Sinhala On Linux

This post may not be of interest to non Sri Lankans, but considering that a large number of Fedora users are from Sri Lanka (http://fedoraproject.org/maps/f9/), I decided to post this here.

I was introduced to the new Sinhala smart font by my friend McoreD, and all credits should go to him for discovering this gem. Currently, all available Sinhala fonts are not romanized. Therefore, typing them and displaying them is a real headache. The new smart font Suriyakumara is the first of it's kind, introducing a romanized sinhala font that is very easy to write and display. If the reader does not have the font installed, the displayed text will be in English, but still readable because the characters are directly translated in to their English equivalents. So no more weird looking gobbledygook we have come to experience with the traditional Sinhala fonts. Anyway, take a look at http://www.lovatasinhala.com/ and you will see what I am talking about. The animated header expresses this concept very nicely.

Getting the font to work on Windows involves installing a new keyboard layout. But in Linux, it was a breeze to setup. I was actually amazed by the ease with which I managed to get it working. This is definitely one of those things where the Linux way is much easier than the Windows way.

1. To begin, download the Suriyakumara font.
wget http://www.americansmartfonts.com/download/Suriyakumara.ttf

2. Make a new folder for the font in /usr/share/fonts and copy it over.
sudo mkdir /usr/share/fonts/sinhala
sudo cp Suriyakumara.ttf /usr/share/fonts/sinhala
cd /usr/share/fonts/sinhala


3. Run the font scaler and refresh the font cache
sudo mkfontscale && sudo mkfontdir
sudo fc-cache


4. The font is now installed. If Firefox was running while you were doing the above, close it and open it again. Then browse to http://www.lovatasinhala.com/. You should see the left column in Sinhala now.

5. Typing in Sinhala is easy. For example, open up Thunderbird, create a new message and type "penguyin" without the quotes. Select what you typed and change the font to Suriyakumara. You should see "Penguin" written in Sinhala.

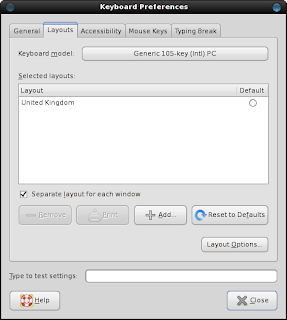
6. Some characters such as "th" require latin characters. To be able to type those, go to System > Preferences > Hardware > Keyboard.

7. Click the Layouts tab and click the Add button.


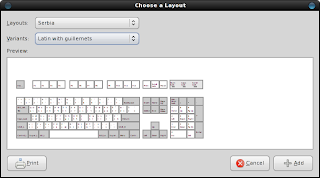
8. Select "Serbia" from the Layout menu and select "Latin with guillements" from the Variants menu. Click Add.


9. By clicking Layout options, you can change the way you want to switch between the different keyboard layouts. I set it to switch when I press both ALT keys together.

10. Give it a spin. For example, to type "thaththa" do the following : "Alt+P aa Alt+P Alt+P aa". The full guide is here.


There is an active dev group over at http://groups.google.com.au/group/SinhalaUserGroup. Take part and help this wonderful project.


Friday, 26 September 2008

Anonymous browsing with Tor and Privoxy

The Onion Router which is most commonly known as Tor, is a wonderful tool for anonymizing your online activity. Tor consists of public proxies setup by trusted members of the Tor community, who allow other users to make use of their proxies to browse the web. In a typical Tor session, there are at least 3 proxies involved, making it very difficult to trace back any online activity to a single user. Furthermore, the communication between the client and the proxies are tunnelled in layers, providing protection against casual snooping as well.

Setting up Tor on Linux was surprisingly easy. Tor binaries are available in the Fedora repositories, so just simply type
sudo yum install tor

Once installed, invoke Tor by typing
tor

The Tor client will start up and attempt to establish a proxy chain. Once this is complete, it will start a SOCKS proxy on port 9050. To Torrify any application, you simply have to configure it to use the proxy server created by Tor at 127.0.0.1:9050.

If you want to completely anonymize your browsing, there's an additional step involved. Usually applications such as web browsers do not use the SOCKS proxy to tunnel DNS queries. This can lead to information leakage because anyone listening in can see by the DNS query that you're attempting to visit that certain site. Therefore even if your data is secure, your browsing history is not.

The simplest solution is to use a HTTP proxy such as Privoxy and configure it to use Tor. This way you can achieve quite a good level of anonymity online without any hassle.

Privoxy is also available in the repositories, so installation is a breeze.
sudo yum install privoxy
Afterwards, you need to configure it to forward requests through Tor.
sudo echo "forward-socks4a / 127.0.0.1:9050 ." >> /etc/privoxy/config
Start the Privoxy daemon by typing
sudo privoxy /etc/privoxy/config

Configure your browser to use an HTTP proxy at 127.0.0.1:8118 and restart it. If everything went smoothly, you're now browsing anonymously. The best way to see this in action is to open up www.google.com. Depending on the location of the Tor exit node, you will be served with a Google page for that specific region. For example, when I tried it, I was served the Google Denmark page because my Tor exit node was in Denmark. You can also use tools like http://whatismyipaddress.com/ to see how your IP has changed completely due to Tor.

The internet is a wild place. If you are worried about privacy, give Tor a spin. It's definitely a good tool to have handy.

Thursday, 25 September 2008

Happy Birthday Fedora !


Cheers! to 5 great years of Fedora infinity and freedom !!

Thursday, 18 September 2008

CrossOver Chromium - Run Chrome on Linux and Mac

Google's Chrome browser (http://www.google.com/chrome) got a lot of attention when it was initially released, and deservingly so. I personally like most of the features implemented in Chrome, but unfortunately the lack of a Linux port makes it harder to test it out. I tried running Chrome with Wine, but there were few configurations that needed to be done that I didn't have time for. Therefore, my Chrome experiments had to be shelved for a later time.

Now thanks to Codeweavers, the company behind the CrossOver Office product, the open source version of Chrome is available as CrossOver Chromium (http://www.codeweavers.com/services/ports/chromium/) for both Linux and Mac users to try out using Wine. This is a wonderful effort by Codeweavers that goes to show how mature Wine has become and how easily adaptable it is.

Installing CrossOver Chromium is a breeze. Just grab the setup from the Codeweavers website and run it. The installer will automatically take care of the rest.


wget http://media.codeweavers.com/pub/crossover/chromium/install-cxchromium-0.9.0.sh
sh install-cxchromium-0.9.0.sh


CrossOver Chromium is quite stable and responsive in my Fedora 9 box. Ofcourse, HTTPS connections will not work because the libraries are not yet fully implemented on Wine. Although Flash is installed using winetricks, Crossover Chromium doesn't seem to recognize it. So Flash animations are out of order at the moment as well.

As clearly mentioned in the Codeweavers site, CrossOver Chromium is not intended as a full software distribution. It is just a proof-of-concept that any sufficiently complex Windows program can be ported to Wine with minimal effort. I think Codeweavers have managed to prove this point splendidly and in the process have enabled us Linux users to experience Chrome without having to boot Windows. Kudos to the team at Codeweavers for the effort.


Thursday, 11 September 2008

Spice up the command line with BashStyle-NG

What I like most about Linux is its powerful command line. Many people find it intimidating, but with a little practice, the command line is the most natural way of interacting with a computer. Things can be done with the command line in less time than it takes to just launch the equivalent GUI utility.

The term "command line" naturally doesn't invoke a very pleasant image because we have come to associate it with a bland, colourless screen filled with text. But in reality, things can't be more further from the truth. X based terminal utilities allow a variety of customizations to tweak the appearance to fit the user's needs. It's well worth the effort to spend some time tweaking the terminal to fit your taste, because sooner or later, you are sure to come across a task that is more easily accomplished using the command line than the GUI.

BashStyle-NG (http://freshmeat.net/projects/bsng/?branch_id=75809&release_id=284647) is a GUI utility that allows the user to customize the command line in more innovative ways. Some of the options provided include:
  • The ability to tweak the prompt in interesting ways to display important information in various colours.
  • Colourizing output from tools like grep and man for easy readability
  • Creating aliases
  • Tweak command history, auto completion and internal variables such as the default editor
  • Change behaviour of editors such as vim and nano
  • Manage user profiles

Installing BashStyle-NG is quite easy. Grab the source tarball from http://freshmeat.net/redir/bsng/75809/url_bz2/BashStyle-7.1.tar.bz2 and configure, make and make install !

BashStyle uses the python-psyco compiler to speed up execution times. It's a good idea to install it before beginning the actual installation.


sudo yum install python-psyco
wget http://freshmeat.net/redir/bsng/75809/url_bz2/BashStyle-7.1.tar.bz2
tar xvf BashStyle-7.1.tar.bz2
cd bashstyle
./configure
make && sudo make install


On my machine, BashStyle-NG got installed with root as the owner. This prevented some of the customizations from working correctly when run as a normal user. To fix this, change the permissions of the BashStyle-NG script.

sudo chmod 0777 /usr/share/bashstyle-ng/system/nx-rc

Now all that's left is to invoke BashStyle and start customizing !
bashstyle


Thursday, 24 July 2008

Encrypted removable storage with Fedora 9

Linux Unified Key Setup (LUKS) is a way to create encrypted disk partitions on Linux. It has been around for a while now, and Fedora 9 provides LUKS support out of the box. Encrypted partitions can be configured to be unlocked with several passphrases, allowing many users to share the partition. Disk access speeds are almost comparable to that of unencrypted disks. Best of all, LUKS is cross-platform. Even Windows users are able to use an encrypted partition created with LUKS.

The number of material on the net about creating LUKS partitions is surprisingly low. The few link I checked out only detailed how to setup permanent encrypted partitions that got mounted at every bootup. My requirement was to encrypt an external hard-drive that I use for backup purposes, therefore I set out to find out the process of encrypting a removable disk on my own. I was helped along the way by http://fedoraproject.org/wiki/Security_Guide/9/LUKSDiskEncryption and http://www.saout.de/tikiwiki/tiki-index.php?page=EncryptedDeviceUsingLUKS


Step 1:
Change in to the single user mode.

telinit 1

Step 2:
Check whether the drive is still mounted. (My drive is plugged in to /dev/sdb. Yours may vary)
mount | grep sdb
Unmount the drive if it is still mounted.
umount /dev/sdb

Step 3 (Optional):
For maximum security, the drive must be filled with random data. This can be done in two ways. Both methods are effective, but take a long time. You will possibly have to leave the process overnight to complete. Be warned; this step will OVERWRITE ALL DATA on the disk.

Method 1:
Use dd to write data from /dev/urandom. Make sure you type it correctly. If you type /dev/random by mistake, your grand-kids will be wrinkled and toothless by the time it finishes.
dd if=/dev/urandom of=/dev/sdb

Method 2:
Suggested by LUKS wiki. Kills two birds with one stone by writing random data to the disk and checking it for errors at the same time.
badblocks -c 10240 -s -w -t random -v /dev/sdb


Step 4:
Create the LUKS partition.
cryptsetup --verbose --verify-passphrase luksFormat /dev/sdb

Step 5:
Load the logical encrypted device.
cryptsetup luksOpen /dev/sdb my_enc_drive
This command will create /dev/mappers/my_enc_drive. You can provide any name you like in place of "my_enc_drive". To check whether the command succeeded, type:
ls -l /dev/mappers
You should see a new entry titled "my_enc_drive" in the output.

Step 6:
Create the file system. You can choose any file system you like. Be aware of permission problems when using secure file systems such as ext3. In this case, I am creating an ext3 file system on the encrypted disk.
mkfs.ext3 /dev/mapper/my_enc_drive

Step 7:
Mount the drive.
mount -t ext3 /dev/mapper/my_enc_drive /media/my_enc_drive

If everything went successfully, your encrypted file system is ready now. Reboot the computer to bring up the desktop and plug the drive in. It is automatically recognized as an encrypted drive and you will be prompted for a password.


In theory, the drive should be mounted automatically after you enter the password. But on my machine, the entry to /dev/mapper was automatically created, but the drive wasn't mounted automatically. I still haven't found the reason for this behaviour, but it is only a minor setback. The drive can be used without any problem by manually mounting it.
sudo mount -t ext3 /dev/mapper/luks_crypto_8e8d6392-7be3-4964-8e6d-9de57e886fa5 /media/my_enc_drive
" luks_crypto_8e8d6392-7be3-4964-8e6d-9de57e886fa5" is the name automatically generated by the HAL daemon. Yours will definitely be different.

To unmount the drive after using it. Simply type:
sudo umount /media/my_enc_drive
sudo cryptsetup luksClose luks_crypto_8e8d6392-7be3-4964-8e6d-9de57e886fa5


LUKS can be a viable alternative to TrueCrypt. The disk access speeds seem much better compared to TrueCrypt, at least on my machine. Best of all, LUKS comes pre-installed with Fedora 9. Therefore you don't need to struggle with getting the sources and compiling TrueCrypt.

Sunday, 13 July 2008

Secure File Deletion With srm

On any operating system, files deleted using the built-in file deletion utilities are never really deleted. Behind the scenes, deletion is simply a matter of removing the file from the directory entry and adding the blocks occupied by the file to the free block list. The file still exists on the disk like a ghost. The OS might reuse some of the blocks for another file, but it's not guaranteed that the whole file will get overwritten, therefore enough sensitive data from deleted files can be recovered with even the simplest of utilities. Even if all the blocks get casually overwritten, there are sophisticated methods that can be employed by a determined attacker to recover most of the overwritten data from a hard drive platter.

srm is a project that attempts to provide secure file deletion options to the familiar rm command used in all Unix derivatives. srm is fully compatible with the regular rm command, therefore there's no learning curve involved. There are 3 options for secure deletion.
  • -s, --simple : Simple one pass overwriting with random data. (Least secure option.)
  • -P, --openbsd : Emulates OpenBSD behaviour by overwriting in 3 passes.
  • -D, --dod : Conforms to the US DoD specification of overwriting in 7 passes.
Installation is a simple affair. Download the tar ball, extract, configure, make, make install, and you're set.

Although it is dificult to guarantee total security, srm is a good open source solution for normal users who wish to keep their data private. A determined government agency might still get to your data, but certainly not your pesky script-kiddie cousin.

Tuesday, 8 July 2008

WPA issues in Kernel 2.6.25.9-76

After accepting an auto update to the kernel which installed kernel 2.6.25.9-76, Fedora 9 failed to connect to WPA enabled wireless networks. The network manager applet kept attempting to connect and failing, repeatedly prompting for the WPA key without any success. Attempting to connect manually using the iwconfig commands also failed when attempting to obtain a DHCP lease using dhclient. Connecting to a WEP network succeeded, suggesting that the problem lay with WPA support. Restarting the wpa-supplicant service with service restart wpa_supplicant failed with the error Starting wpa_supplicant: /etc/wpa_supplicant/wpa_supplicant.conf, , dbus_bus_request_name[dbus]: Resource temporarily unavailable. At this point I was stymied with no possible solution coming to mind except reverting back to the old kernel, which worked perfectly. Judging by the bugzilla report, the problem appeared to be related to a couple of wireless fixes incorporated in to the kernel.

At this point, I decided to wait a couple of days for an updated kernel to be pushed through the auto-updates. But since none seemed to be forthcoming, I downloaded kernel-2.6.25.10-86.fc9.i686 from Koji (http://koji.fedoraproject.org/koji/buildinfo?buildID=55121) and installed it without any problems using yum.
sudo yum --nogpgcheck localinstall kernel-2.6.25.10-86.fc9.i686.rpm kernel-devel-2.6.25.10-86.fc9.i686.rpm kernel-headers-2.6.25.10-86.fc9.i386.rpm

The new kernel fixes the WPA issue and my wireless network is back online again. If you are experiencing the same problem, I recommend the latest kernel build, which is working perfectly for me at the moment.

Monday, 7 July 2008

TrueCrypt 6.0 on Fedora 9

TrueCrypt 6.0 was released on 4th of July. The new version has many improvements, the most important ones being parallelized encryption/decryption and hidden volume support for Linux and MacOS. Parallelized encryption/decryption makes use of multiple cores to speed up the process, therefore TrueCrypt on a dual core machine would be twice as fast compared to a machine with a single core processor. The new version for Linux also makes use of the native kernel cryptographic services for the XTS mode, making disk accesses almost as fast as normal disk accesses. Full feature list for TrueCrypt 6.0 can be found at http://www.truecrypt.org/docs/?s=version-history

Since there are no binaries for Fedora, TrueCrypt has to be compiled from the source. The process is quite straight forward and hasn't changed since the last release. The sources have been fixed with the correct includes, so this version will not spill out compiler errors.

TrueCrypt 6.0 is a worthy update that will make your disk encryption process more streamlined.

Thursday, 3 July 2008

Firefox 3 sets a world record !

The Firefox Download Day was an absolute success with over 8 million unique copies downloaded within the first 24 hours of release. The Guiness book of world records has officially confirmed it today.

Don't forget to get your Download Day contributor certificate. :) Mozilla will be mailing you a link to the site to download it.

Saturday, 28 June 2008

Resumable SFTP/SCP Transfers

Transmission errors inevitably occur during any online activity. This is specially true when tranferring large files. Murphy always prefers to poke his nose in at the worst possible time to disrupt an important file transfer.

Although HTTP and FTP transfers can be resumed without starting all over again, SFTP and SCP do not provide this capability out of the box. There are essentially two methods to obtain resumable SFTP and SCP transfers, but they are not 100% reliable. However, if you are stuck with an unreliable communication channel and a server supporting only SCP/SFTP, then it's the only ray of hope.

Method 1:
rsync supports resumable transfers across secure connections, and is the most easy to use solution. The downside is that both the server and the client must have rsync installed. If you're fortunate enough to have a server that supports rsync, the following command is all you will need.
rsync --partial --progress --rsh=ssh file_name user@host:server_path

If you use SCP on a daily basis, then it's worthwhile to add an alias to quickly start resumable transfers by editing ~/.bashrc and adding a line similar to:
alias scpr='rsync --partial --progress --rsh=ssh'
The invocation syntax will be similar to a normal scp command. For example:
scpr myfile.tar me@myremotehost.com:~/mydir/

Method 2:
cURL the multi-protocol URL grokker also provides resumable transfers with the -C flag.
curl -C -Tfile_name -u username sftp://myhost/mypath/

libcurl provided with my Fedora 9 setup is not built with libssh2 to enable SFTP and SCP. You can check whether your distribution has a libcurl that supports SCP/SFTP by running:
curl-config --protocols

I downloaded and compiled cURL from source to enable SCP and SFTP. However, I did not dare to replace the libcurl shipped with Fedora because there are over 85 programs depending on it. The downside is that my binary gets built by linking to the old libcurl which does not support SFTP and SCP ! However, I can run the curl static executable from the build directory with full SCP and SFTP support. Building a separate dynamic executable shouldn't be that difficult, but it requires wading through the Makefiles. Since I am not in a dire need for curl with SFTP and SCP support, I will defer this adventure to another time.

Friday, 27 June 2008

Fedora Sytem Restore

One of the good features of Microsoft Windows is the system restore tool which allows quick rollbacks to a previous state. When I was a Windows user, I had to make use of it extensively because the auto-updates always seemed to screw up something and make my system unusable. With Linux, that sort of problems are rare because the repositories are well managed. But sometimes things do tend to get messy after an update. I have had my fair share of updates gone awry, but they were minor infractions that didn't leave my system completely unusable. However, the time I spent on untangling the mess would have been better spent somewhere else.

Today by chance I came across a Linux Journal article about a little known feature of yum and rpm which allows rollbacks to previous states, just like Windows system restore does ! I have no idea why this feature is not enabled by default or why is it not more widely publicized, but who am I to argue with the collective inteligence of the wizards at RedHat and Fedora ?

Basically, to manually enable rollbacks of a certain install, the user has to repackage the old rpm so that it's state is saved. However, doing this manually for each and every package is cumbersome and error prone. Follow these steps to make this process automatic.

1. Edit /etc/yum.conf and add the line tsflags=repackage
2. Edit /etc/rpm/macros (You might need to create this file) and add
%_repackage_all_erasures 1
%_repackage_dir /repackaged

%_repackage_dir is not neccessary for the funcationality. But it's advisable to set it to a partition with lots of space, so that it doesn't eat out the disk space from the important data partitions.

To rollback to a previous state, simply run rpm with the -rollback option and the desired time.
rpm -Uvh -rollback '2 hour ago'

ONLamp blog lists several other variants to invoke rollback such as:
rpm -Uvh -rollback '8.00 am'
rpm -Uvh -rollback 'november 1'


Edit: After enabling repackaging on my Fedora 9 system, packagekit reported repackaging errors during an update. I am still trying to find a solution to get rid of the error messages while keeping repackaging instact. Proceed at your own risk.

Tuesday, 17 June 2008

Wine 1.0 and Firefox 3.0

Well.. today seems to be a big day for FOSS. Major releases of two of the best and greatest open source software were released a few hours apart on a single day !. Version 3 of Firefox, undoubtedly the best web browser ever, was released a few hours ago. (Don't forget to help the Mozilla team in their world record attempt by downloading a copy of Firefox.) Then to add icing to the cake, the Wine team have released version 1.0 of wine, which has been 15 years in the works ! This is indeed a great day for FOSS supporters everywhere.

I compiled wine 1.0 on my Fedora 9 system with minimum hassle. In fact, all I had to do was download the sources, untar them and then run the command:
./tools/wineinstall

At one point the compilation process failed throwing an error on dlls/user32/tests/menu.c. I simply deleted menu.c from the sources list of dlls/user32/tests/Makefile and everything worked perfectly !

Congratulations are in order for all Mozilla and Wine developers. Great job guys. Keep it up !

Saturday, 7 June 2008

Installing Google Gadgets in Fedora 9

Google recently open-sourced the Google Gadgets framework for Linux (http://code.google.com/p/google-gadgets-for-linux/). As is most Google products, this is still in beta, so the installation experience on my Fedora 9 machine wasn't exactly smooth. But the quirks were easy to iron out.

Dependencies
The only dependency not available in the official repos is the SpiderMonkey library. Follow these steps to compile SpiderMonkey 1.7 on your machine.

Step 1:
Grab the source tarball and extract the contents.
wget http://ftp.mozilla.org/pub/mozilla.org/js/js-1.7.0.tar.gz
tar xvf js-1.7.0.tar.gz


Step 2:
By default the build options for SpiderMonkey is set to create a debug version. Since I am not planning to use SpiderMonkey for development purposes, I compiled an optimized version of the library.
cd js/src
make -f Makefile.ref BUILD_OPT=1


Step 3:
If the compilation was successful, a folder titled Linux_ALL_OPT.OBJ will be created in the src directory. To test whether everything is working fine type:
Linux_ALL_OPT.OBJ/js perfect.js
You should see an output similar to the following:


A number is 'perfect' if it is equal to the sum of its
divisors (excluding itself).

The perfect numbers up to 500 are:
6 = 1 + 2 + 3
28 = 1 + 2 + 4 + 7 + 14
496 = 1 + 2 + 4 + 8 + 16 + 31 + 62 + 124 + 248
That's all.

Step 4:
Create the following symbolic links for ease.
sudo ln -s Linux_ALL_OPT.OBJ/libjs.so /usr/lib/libjs.so
ln -s Linux_All_OPT.OBJ/jsautocfg.h
ln -s Linux_All_OPT.OBJ/jsautokw.h


SpiderMonkey is now ready for Google Gadgets.

Installing Google Gadgets
The public release of Google Gadgets threw up a lot of compilation errors at me. Most of them were trivial and I could fix them with single edits to the source files, but soon things got really ugly. Since I didn't want to spend time reading and understanding the WHOLE code base, I decided to grab the SVN source in the hopes that most of the bugs were fixed. It turns out I was right !

Step 1:
Grab the sources.
svn checkout http://google-gadgets-for-linux.googlecode.com/svn/trunk/ google-gadgets-for-linux-read-only
cd google-gadgets-for-linux-read-only/


Step 2:
Setup the build environment.
sh autotools/bootstrap.sh
cp /usr/share/automake-1.10/mkinstalldirs ./libltdl/


Step 3:
Run configure with the path to SpiderMonkey sources. I also disabled QT elements because I primarily use Gnome.
./configure --with-smjs-incdir=~/bin/spidermonkey/js/src --disable-libggadget-qt --disable-qt-system-framework --disable-qtwebkit-browser-element --disable-qt-host

Step 4:
Make and install.
make && sudo make install

Step 5:
Run GoogleGadgets !
ggl-gtk


Thursday, 29 May 2008

Set a world record !


Download Day 2008


Help the Mozilla foundation to set a Guiness world record ! Pledge to download Firefox 3 on the release day !!
http://www.spreadfirefox.com/en-US/worldrecord/

Wednesday, 28 May 2008

Configuring VPNC on Fedora 9

vpnc is an opensource alternative to using the Cisco VPN client on Linux machines. If your corporate or school VPN is Cisco based, vpnc is a great tool to use compared to the ugly tainted kernel modules produced by the Cisco VPN client. The default vpnc client on Fedora 9 is compiled without OpenSSL suuport, therefore it is not possible to directly use vpnc to connect to VPN's that use SSL certificates (AuthType=5). The solution is simple however, just compile vpnc with OpenSSL support !.

Step 1:
Grab the OpenSSL source from http://www.unix-ag.uni-kl.de/~massar/vpnc/
wget http://www.unix-ag.uni-kl.de/~massar/vpnc/vpnc-0.5.1.tar.gz

Step 2:
Untar the sources.
tar xvf vpnc-0.5.1.tar.gz

Step 3:
Uncomment the following lines from the Makefile (lines 49-50).
OPENSSL_GPL_VIOLATION = -DOPENSSL_GPL_VIOLATION
OPENSSLLIBS = -lcrypto


Step 4:
Make and install.
make && sudo make install

Step 5:
Edit /etc/vpnc/default.conf and add your VPN settings. These can be found from the .pcf file provided by your system admin. The important settings are:
IPSec gateway 10.1.1.0 #IP address of your gateway

IPSec ID MyVPN #Group name of your VPN

IPSec secret mypassword #Group password in plaintext. If not known, use IPSec obfuscated secret

IPSec obfuscated secret 234AB765C #Encrypted group password.

IKE Authmode hybrid #keep this setting unless it's different for your VPN

CA-File /etc/vpnc/rootcert #Full path to the root server certificate file


Step 6:
Start the client.
sudo /usr/local/sbin/vpnc
The client will prompt you for the username and password. You can store these values in the config file by using the XAuth username and XAuth password fields if you want vpnc to automatically login without prompting you.

If the settings are correct, vpnc will fork to the background and start the encrypted tunnel, Your VPN connection is up and running !

Tuesday, 27 May 2008

Installing TrueCrypt in Fedora 9

[This article has been updated for Fedora 10. Go over to http://penguinenclave.blogspot.com/2008/12/truecrypt-61-install-guide-for-fedora.html to see the new version]
TrueCrypt (http://www.truecrypt.org/) is a popular free on-the-fly disk encryption software that can encrypt files, partitions, whole disks and even a windows installation. It is an extremely useful and important tool if you wish to keep personal and confidential data from being accessed by unauthorized people. TrueCrypt even supports plausible deniability, allowing you to hide an encrypted volume inside another volume. TrueCrypt volumes are indistinguishable from random data, so an adversary cannot prove that you have a TrueCrypt volume hidden inside a dummy encrypted volume.
Unfortunately, the TrueCrypt website only provides binaries for Ubuntu and OpenSuSE, so for those of us running other distros, the only option is to compile from source. The steps below outline the installation procedure on a Fedora 9 machine.

For an advanced encryption utility, TrueCrypt is surprisingly light on size and dependencies. Download the TrueCrypt sources from http://www.truecrypt.org/downloads2.php (Select Mac OS X / Linux (.tar.gz) from the combo box and tick the check box to agree to the license agreement before clicking the Download button) and wxWidget sources from http://sourceforge.net/project/showfiles.php?group_id=9863 (You only need the wxGTK bundle).

Step 1:
Install the fuse libraries.
sudo yum install fuse-devel

Step 2:
Untar the sources.
tar xvf TrueCrypt\ 5.1a\ Source.tar.gz
tar xvf wxGTK-2.8.7.tar.gz


Step 3:
Build the wxWidgets sources for TrueCrypt.
cd truecrypt-5.1a-source/
make WX_ROOT=../wxGTK-2.8.7 wxbuild

Edit:An anonymous commenter pointed out that passing a relative path to WX_ROOT resulted in compilation errors. If you have the same problem, provide the full path to wxGTK.
make WX_ROOT=/home/januz/Downloads/wxGTK-2.8.7 wxbuild


Step 4:
Build TrueCrypt.
gcc 4.3 is very strict during compilation, therefore you will encounter compilation errors with a message similar to "‘memcpy’ was not declared in this scope". The fix is to simply add
#include <cstring> to each of the following files:
  • Platform/Memory.cpp

  • Volume/EncryptionTest.cpp

  • Core/FatFormatter.cpp

I have created a patch file with the above changes which can be found here. To apply the patch, run the following command:
patch -p1 < truecrypt5.1.patch
Once the sources are patched, compile TrueCrypt by typing
make

Step 5:
Once make has finished running, the TrueCrypt executable can be found inside the Main directory. Simply copy it to your bin folder to add it to the executable path.
cp Main/truecrypt ~/bin

That's it ! TrueCrypt is quite intuitive and easy to use. But if you're in doubt, have a look through http://www.truecrypt.org/docs/ which has very detailed instructions on getting started.


Thursday, 22 May 2008

Fedora 9 and ATI Catalyst 8.5

ATI released the Catalyst 8.5 driver for linux on May 21st. I was hoping that the new driver had resolved all the previous problems with Fedora 9, but unfortunately it is still broken. They have managed to fix the issue with Kernel 2.6.25, but it still doesn't support the Xorg 1.5 ABI. The worst part is that it looks as if the developers didn't even take a few minutes to actually test the driver in a Fedora 9 machine. Running the installer results in the following output:
./ati-driver-installer-8-5-x86.x86_64.run --buildpkg Fedora/F9
[snip]
Generating package: Fedora/F9
Package build failed!
Package build utility output:
error: %changelog entries must start with *


This sounds like a problem in the SPEC file, so I extracted the sources and checked packages/Fedora/ATI-fglrx.spec-tmpl.
./ati-driver-installer-8-5-x86.x86_64.run --extract ati_src
grep "changelog" ati_src/packages/Fedora/*


The first line in the changelog section of the spec file doesn't start with a * character and this causes the package generator to halt with the above error. Since the line seems to be a todo line to remind the developers ("- Add compat-libstdc++ as a required dependency"), I deleted it and ran the installer again.
cd ati_src
./ati-installer.sh 8.493 --buildpkg Fedora/F9


This time the installer stops with the error:
error: Installed (but unpackaged) file(s) found:
/usr/X11R6/lib/libatiadlxx.so

This stems from a new rpmbuild setting. To disable it, add the lines
%define _unpackaged_files_terminate_build 0
%define _missing_doc_files_terminate_build 0
to packages/Fedora/ATI-fglrx.spec-tmpl and run the installer again. This time the drivers will compile without a problem.

If anyone is interested in getting the ATI drivers to compile on a Fedora 9 machine, grab my patch at http://januz.awardspace.co.uk/ati-8-5.patch . It makes the necessary changes to the spec file to enable it to compile.
./ati-driver-installer-8-5-x86.x86_64.run --extract ati_src
wget http://januz.awardspace.co.uk/ati-8-5.patch
patch -p1 < ati-8-5.patch
sudo sh ati_src/ati-installer.sh 8.493 --install


However, ATI still doesn't seem to support the new Xorg 1.5 ABI and the driver crashes on X server restart. So the only way to get the driver to work is to downgrade the X server. I don't have a dire need to get the ATI driver working because the current radeon driver is working quite well for me, so I leave things at that. However, I am a bit miffed at the way ATI is handling the Xorg 1.5 support. After all, Fedora 9 has been available for over 2 months now, so they do have a testbed to test it.

Tuesday, 13 May 2008

Fedora 9 Sulphur finally released !

Fedora 9 Sulphur was officially released today. The net is abuzz with the news, so I am not going to repeat them here. I actually had the chance to experience the full Fedora 9 release a few days earlier, thanks to a misconfigured update server in Europe. For about a month, I have been using Fedora 9 RC as my main OS and I am loving it. It's one of the best releases ever in Fedora history. So give it a try, you won't regret it.
Release notes: http://docs.fedoraproject.org/release-notes/f9/en_US/
Download: http://fedoraproject.org/en/get-fedora

Thursday, 8 May 2008

Laptop Sound Issues in Linux

Quite by accident I realized that my laptop running Fedora 9 Preview release only outputs sound through the headphones. When the headphones are unplugged, although the music keeps playing, no sound comes out of the speakers. This set me off on a hunt for a solution which I only stumbled on to a few minutes ago.

First of all, a liitle bit of details regarding my setup. The laptop is a Sony Vaio VGN-CR11Z. lspci identifies my audio controller as Intel Corporation 82801H (ICH8 Family) HD Audio Controller (rev 03) . Running
cat /proc/asound/card0/codec#0 | grep Codec produces Codec: Realtek ALC262 as the output.

Step 1
Download and compile alsa-drivers, alsa-lib and alsa-utils from http://www.alsa-project.org/. alsa-drivers refused to compile on my machine, and I had to edit the source files to get them to compile. I created a patch file to help others with similar problems, which can be found here. Apply the patch as follows:
./configure
make
cd ..
patch -p0 < alsa.patch


Step 2
Find the valid arguments to the model parameter. First check the output of cat /proc/asound/card0/codec#0 | grep Codec and then look at the valid models listed in the ALSA documentation for that codec. (Online copy at http://www.mjmwired.net/kernel/Documentation/sound/alsa/ALSA-Configuration.txt). Add this parameter to /etc/modprobe.conf as follows.
sudo echo "options intel-hda-sound model=fujitsu" >> /etc/modprobe.conf

Step 3
Reboot the machine and check whether the sound works as expected. You might need to fiddle with the value of model parameter to get it right. For my ALC262 card, neither fujitsu nor sony-assmd parameters worked. However, adding model=auto worked perfectly.

Wednesday, 7 May 2008

Laptop hard drive issues in Linux

Since I switched to using Fedora 9 Preview release as my primary operating system, I noticed some excessive amount of disk activity even while the computer was idle. After digging around the net for a while, I discovered that this problem has been known for quite some time - specially within the Ubuntu community.

As it turns out, the Linux kernel does not explicitly apply ACPI power saving settings on hard drives. Instead, the settings for the hard drive are taken from the BIOS, which is quite logical since who knows the system better than the system manufacturer itself ? The problem is that most laptop BIOS's are set to manage the hard drive for optimal battery usage and mobility. Since sudden bumps can cause head crashes, the disk heads are parked frequently while not in use. Therefore when a new disk request comes in, the heads need to be unparked again to service it. Although in the short term this reduces the number of unpleasant disk crashes, the constant parking and unparking of the heads cause wear and tear on the drive mechanism - reducing the lifespan of the drive.

In SMART enabled hard drives, the parameter Load_Cycle_Count keeps track of the number of head parkings. Typically during the life time of a hard drive it can handle about 600,000 load cycles, after which it becomes less reliable. To check how many Load_Cycle_Counts are clocked on your machine, run the following command. (Assuming your hard drive is /dev/sda)
sudo /usr/sbin/smartctl -a /dev/sda | grep Load_Cycle_Count

I monitored my Load_Cycle_Count for a period of two hours and discovered that during that time the counter increased by 7, which is certainly not good. I followed the instructions found at http://ubuntuforums.org/showpost.php?p=3675960&postcount=26 to set the hard drive power saving mode manually as follows:
sudo hdparm -B 254 /dev/sda

That was it ! My Load_Cycle_Count froze in place and the frequent hard drive chatter vanished.

A word of warning : Don't set the power saving mode manually unless the laptop is stationary and is running on AC power. The default settings are meant to protect the hard drive from any accidental damage and prolong battery life.

Sunday, 27 April 2008

ATI driver madness in Kernel 2.6.25 - A bit of detective work

As I mentioned before in the guide to Fedora 9 Preview release, the proprietary ATI drivers don't work on Fedora 9. Compiling the driver by using the buildpkg argument to the driver installer generates the following output:

make[1]: Entering directory `/usr/src/kernels/2.6.25-8.fc9.i686'
CC [M] /tmp/ATI-fglrx-8.476-1-10249-januz/tmp/ATI-fglrx-8.476-1.f9-root-januz/lib/modules/fglrx/build_mod/2.6.x/firegl_public.o
/tmp/ATI-fglrx-8.476-1-10249-januz/tmp/ATI-fglrx-8.476-1.f9-root-januz/lib/modules/fglrx/build_mod/2.6.x/firegl_public.c: In function 'KCL_PosixSecurityCapGetEffectiveVector':
/tmp/ATI-fglrx-8.476-1-10249-januz/tmp/ATI-fglrx-8.476-1.f9-root-januz/lib/modules/fglrx/build_mod/2.6.x/firegl_public.c:1888: error: implicit declaration of function 'cap_t'
/tmp/ATI-fglrx-8.476-1-10249-januz/tmp/ATI-fglrx-8.476-1.f9-root-januz/lib/modules/fglrx/build_mod/2.6.x/firegl_public.c: In function 'KCL_PosixSecurityCapSetEffectiveVector':
/tmp/ATI-fglrx-8.476-1-10249-januz/tmp/ATI-fglrx-8.476-1.f9-root-januz/lib/modules/fglrx/build_mod/2.6.x/firegl_public.c:1896: error: lvalue required as left operand of assignment
make[2]: *** [/tmp/ATI-fglrx-8.476-1-10249-januz/tmp/ATI-fglrx-8.476-1.f9-root-januz/lib/modules/fglrx/build_mod/2.6.x/firegl_public.o] Error 1
make[1]: *** [_module_/tmp/ATI-fglrx-8.476-1-10249-januz/tmp/ATI-fglrx-8.476-1.f9-root-januz/lib/modules/fglrx/build_mod/2.6.x] Error 2
make[1]: Leaving directory `/usr/src/kernels/2.6.25-8.fc9.i686'
make: *** [kmod_build] Error 2
build failed with return value 2


So it seems like cap_t is the culprit here. I am not a kernel hacker, so I have no idea what cap_t is supposed to accomplish. A Google search found this blog post, that describes exactly the same problem. The author has traced back the steps to actually find the kernel patch that caused the errors to crop up !. Apparently cap_t used to be defined as an int, but in the new kernel it has become an int array. The blog post contained two patches for the source files but there was no mention about how to apply them. ATI drivers come as a single executable package with no other files. Therefore getting to the source files was a problem.
Out of curiosity, I opened up ati-driver-installer-8-4-x86.x86_64.run in vim to glance through the script and I discovered a function that listed one of the valid arguments to the script as 'extract'.
MS_Help()
{
cat <<>&2
Makeself version 2.1.3
1) Getting help or info about $0 :
$0 -h|--help Print this message
$0 -i|--info Print embedded info : title, default target directory, embedded script
$0 -l|--list Print the list of files in the archive
$0 -c|--check Checks integrity of the archive
$0 --extract NewDirectory Extract this package to NewDirectory only

2) Running $0 :
$0 [options] [additional arguments to embedded script] with following options (in that order)
--keep Do not erase target directory after running the embedded script
Following arguments will be passed to the embedded script:
--install Install the driver(default)
--listpkg List all the generatable packages
--buildpkg package Build "package" if generatable ("package" as returned by --listpkg)
EOH
}


Running the installer package with the extract command as
ati-driver-installer-8-4-x86.x86_64.run --extract ati_src
created the directory ati_src with all the scripts and source files included in the driver package.

Patching the source tree was done easily. I copied the two patch sources from http://sarah-a-happy.livejournal.com/90345.html in to two files named patch1.patch and patch2.patch which I saved in the ati_src direcotry. Then all that was left to do was the actual patching itself !
patch -p0 < patch1.patch
patch -p0 < patch2.patch


To test whether the patches were working, I needed to run the installer again. But now since everything was extracted, the process was not quite obvious at first. I took my chances with the ati-installer.sh script that I found on the ati_src directory and ran it as follows:
./ati-installer.sh --buildpkg Fedora/F9
==================================================
ATI Technologies Linux Driver Installer/Packager
==================================================
Unrecognized parameter 'Fedora/F9' to ati-installer.sh
This script supports the following arguments:
--help : print help messages
--listpkg : print out a list of generatable packages
--buildpkg package : if generatable, the package will be created
--install : install the driver


So obviously the script was expecting more arguments. I opened up the script in vim to look through the code and discovered the following set of lines
DRV_RELEASE=$1
ACTION=$2

# Process input command
status=0
case "${ACTION}" in

--install)

SIGNATURE=$3

Aha ! The first argument to the script is the driver release version. Since this is the release 8.4 of the driver, I was sure that it is what the script was looking for, but to be doubly sure I opened up ati-driver-installer-8-4-x86.x86_64.run again to look through the source. The script invocation looks like this:
#extract the driver release version information from ${label}, which was set when we use makeself.sh to create
#this .run archive
drv_release=`echo $label | cut -d'-' -f2`


I found the declaration of $label at the very beginning of the script
label="ATI Proprietary Linux Driver-8.476"

So it was quite simple to execute the cut command inside my head and figure out that the expected argument was 8.476. With that knowledge, the drivers can now be compiled.

./ati-installer.sh 8.476 --buildpkg Fedora/F9

Yowza ! The drivers compile with no errors now !!

This is where the fun ends. I installed the drivers and restarted X, only to get a nasty X error that complains about a missing symbol named miZeroLineScreenIndex. A look through http://forums.fedoraforum.org/ revealed that X server 1.5 has a different ABI and any code written for older versions of X will fail to work. Fedora 9 Preview release ships with X server 1.4.99, the final test release before X 1.5 is officially released. Therefore, in order to get the drivers working, I would need to downgrade the X server. Now the main reason that Fedora is my distro of choice is because it represents the bleeding edge in the Linux world. While it makes getting things to work a nightmare, the rush you get from successfully getting things to work is unbelievable. So keeping to that philosophy, I decided to stick with the current X server and forget about ATI drivers for now. Besides, the open source radeon drivers that ship with Fedora work really well and I only missed the proprietary drivers when I attempted to get compiz-fusion working. But compiz can wait a few more days.

If you really want to get the ATI driver working on Fedora 9, downgrade Xorg as follows:

wget http://download.fedora.redhat.com/pub/fedora/linux/updates/8/i386/xorg-x11-server-Xorg-1.3.0.0-44.fc8.i386.rpm
sudo rpm -Uvh --oldpackage xorg-x11-server-Xorg-1.3.0.0-44.fc8.i386.rpm


There might be some dependencies on Xorg 1.4 that will prevent the downgrade. I haven't gone through the process, so I don't know what it entails. Good luck !!!

aMSN - snack audio

In order to have voice support in aMSN (http://www.amsn-project.net/) a third party library named libsnack is required. Some distributions have this library in the repositories while some do not.

The snack libraries are available at http://www.speech.kth.se/snack/download.html. If you can't find the binaries for your distro, download the source and compile.

wget http://www.speech.kth.se/snack/dist/snack2.2.10.tar.gz
tar xvf snack2.2.10.tar.gz
cd snack2.2.10/unix
sudo yum install tcl-devel tk-devel
./configure --prefix=/usr/share/tk8.5
make
sudo make install


If snack is already installed but aMSN reports that it cannot find the libraries. The solution is listed here http://www.amsn-project.net/forums/viewtopic.php?t=4969&highlight=snack. In my system, snack was installed in /lib/snack2.2 and it wasn't included in the aMSN path. To figure out the path used by aMSN, load aMSN and press Shift+Ctrl+C to bring up a console. Then type set ::auto_path If /lib is not in the output, create a symlink to /lib/snack2.2 in one of the paths searched by aMSN. I simply did
sudo ln -s /lib/snack2.2/ /usr/share/tk8.5/snack2.2

Now aMSN should detect libsnack and audio settings should work as expected.

Saturday, 26 April 2008

Sony MotionEye Webcam on Fedora 9

Most of Sony Vaio laptops come equipped with the motion eye webcam, which unfortunately doesn't get detected on linux automatically. On my machine, lsusb command lists the camera as
Bus 001 Device 003: ID 05ca:1839 Ricoh Co., Ltd . But no modules are loaded by the kernel and no video devices are created in /dev. Installing the driver is easy, but some configuration is required.

1. Make sure the kernel development headers are installed
sudo yum install kernel-devel
2. The drivers are hosted at http://wiki.mediati.org/R5u870. Download the latest source from svn.
svn co http://svn.mediati.org/svn/r5u870/trunk r5u870
3. make and install
cd r5u870
make
sudo make install

4. Copy the firmware files to /lib/firmware
sudo cp r5u870*.fw /lib/firmware
5. Load the module
sudo modprobe r5u870

Now you need to blacklist the default uvcvideo module from loading(Source : http://ubuntuforums.org/showthread.php?t=706530).
6. Create a new file in /etc/modprobe.d
sudo touch /etc/modprobe.d/uvcvideo-blacklist
7. Add the following line to the newly created file and save
blacklist uvcvideo

Restart the machine for changes to take effect. Then run the following command to test whether everything is working correctly. (Source : http://ubuntuforums.org/showthread.php?t=706530).
gst-launch-0.10 v4l2src ! ffmpegcolorspace ! ximagesink

If you can see yourself , the driver has installed correctly. However, to get it working with cheese and some other utilities, you need to create the haldaemon fdi file as described in http://ubuntuforums.org/showthread.php?t=706530. Download the attached file from the above link and then run the following commands.

sudo cp 10-r5u870-webcam.fdi.txt /usr/share/hal/fdi/information/20thirdparty/10-r5u870-webcam.fdi
sudo service haldaemon restart


That's it !. Enjoy !!

Compiling Wine 0.9.60 on Kernel 2.6.25-1

Fedora 9 rawhide repositories only contain wine 0.9.58 and there seem to be some kind of a bug in the packages since it crashes everytime with a page fault. So I decided to compile wine 0.9.60 from the source. However, unlike last time, I had to fix several lines in the code to make wine compile without errors. The procedure is as follows:

1. First, run configure.
./configure

2. Then edit the sources as follows:

dlls/iphlpapi/ipstats.c
Replace lines 43-51 with
#include <linux/if.h>
#include <linux/route.h>
#include <linux/if_arp.h>


dlls/user32/tests/Makefile
Delete line 21 that looks something like
menu.c /

3. That's it. Now you can build wine

make depend && make
make install


Hope that helps. I will try to put up a patch file up soon.

Edit: If Photoshop CS2 fails to start and throws an error that sounds like 'Unrecoverable software/hardware error', install corefonts from http://corefonts.sourceforge.net/. If building the RPM is too much work for you, Mauriat Miranda's excellent Fedora 8 guide has a link to the rpm. http://www.mjmwired.net/resources/mjm-fedora-f8.html#ttf

Friday, 25 April 2008

CD Burning Permissions in Linux

There are many options for burning CDs and DVDs in linux. This article is not about any particular disk burning tool. In some linux configurations, the normal users do not have exclusive rights to the cd burning device and this causes the burn process to fail. Although this can be solved by running the cd recording utility as root, it is not very elegant nor recommended for daily use.
Usually the permission problems crop up because the user doesn't have write access to the /dev/sg* devices. This can be solved by a simple
sudo chmod o+w /dev/sg*However, in many modern linux distributions, the /dev devices are created automatically at runtime by the udev daemon. So setting permissions like above will only last for that particular session. You can ofcourse modify /etc/rc.local or other startup script to change the permissions everytime on boot, but it is also a rather inelegant solution.

Ofcourse, there's more than one way to skin a rabbit. So if you're ok with the solutions I outlined above, you can forget about the rest of the article. If you get a thrill out of editing esoteric config files, keep reading . :)

The way I proceeded to solve the problem was by scanning through the /etc/udev directory. I noticed that there is a folder titled rules.d which contained a lot of scripts organized in a similar way to the scripts in /etc/rc.d directories. There are many scripts for lot of special devices on my system, but nothing that seemed specially setup for cd-roms or block devices. Therefore I proceeded to open up the most likely candidate titled /etc/udev/rules.d/50-udev-default.rules. Sure enough about halfway through the very lengthy file, I discovered the line where the /dev/sg* devices were being created. The line looks like
# block, tapes, block-releated
SUBSYSTEM=="block", GROUP="disk", MODE="0640"
SUBSYSTEM=="block", KERNEL=="sr[0-9]*", SYMLINK+="scd%n"
SUBSYSTEM=="scsi", KERNEL=="[0-9]*:[0-9]*", ACTION=="add", ATTR{type}=="0|7|14", ATTR{timeout}="60"
SUBSYSTEM=="scsi", KERNEL=="[0-9]*:[0-9]*", ACTION=="add", ATTR{type}=="1", ATTR{timeout}="900"
KERNEL=="hd*", SUBSYSTEMS=="ide", ATTRS{media}=="floppy", OPTIONS+="all_partitions"
KERNEL=="fd[0-9]", GROUP="floppy"
KERNEL=="fd[0-9]", ACTION=="add", ATTRS{cmos}=="?*", RUN+="create_floppy_devices -c -t $attr{cmos} -m %M -M 0640 -G floppy $root/%k"
KERNEL=="sch[0-9]*", GROUP="disk"
KERNEL=="sg[0-9]*", ATTRS{type}!="3|6", GROUP="disk", MODE="0640"
KERNEL=="ht[0-9]*|nht[0-9]*", GROUP="disk"
KERNEL=="pg[0-9]*", GROUP="disk"
KERNEL=="pt[0-9]*|npt[0-9]*", GROUP="disk"
KERNEL=="qft[0-9]*|nqft[0-9]*|zqft[0-9]*|nzqft[0-9]*|rawqft[0-9]*|nrawqft[0-9]*", GROUP="disk"
KERNEL=="rawctl", NAME="raw/%k", GROUP="disk"
SUBSYSTEM=="raw", KERNEL=="raw[0-9]*", NAME="raw/%k", GROUP="disk"
KERNEL=="pktcdvd[0-9]*", NAME="pktcdvd/%k"
KERNEL=="pktcdvd", NAME="pktcdvd/control"
KERNEL=="qft0", SYMLINK+="ftape"
SUBSYSTEM=="bsg", NAME="bsg/%k"
SUBSYSTEM=="aoe", NAME="etherd/%k", GROUP="disk"


Problem solved. All I needed to do was change the mode to 0660 and add myself to the disk group.
The modified line in /etc/udev/rules.d/50-udev-default.rules looks like
KERNEL=="sg[0-9]*", ATTRS{type}!="3|6", GROUP="disk", MODE="0660"

Then I added myself to the disk group.
sudo usermod -a -G disk januz
To make sure you're in the disk group, run
groups januz If the output contains 'disk', then you're done. The next time you reboot the machine, the cd recording devices will be writable by you and the cd recording tools won't be throwing out any nasty permission errors.